31
RQT8432
1 While the unit is on
Press [DRIVE SELECT] to select the
recording drive and press [∫].
2 Press [2, 1] to select “Stop
Recording” and press [ENTER].
If you stop a timer recording, it will be cancelled. However, if
you have set a weekly or daily timer recording, the recording
will start from the next time the timer recording is set.
≥Even when the unit is turned off, you can display the timer
recording list by pressing [PROG/CHECK].
1 Press [PROG/CHECK].
2 Press [3, 4] to select the programme
and press the “Red” button.
≥The timer icon “F” (➡ right) disappears from the timer
recording list.
≥You cannot cancel timer recording standby mode as long as
even one timer icon “F” (➡ right) remains in the timer
recording list.
≥Press the “Red” button again to activate timer recording
standby.
≥“F” flashes on the unit’s display for about 5 seconds when the unit
cannot go to timer recording standby.
≥Timer recordings are activated regardless of whether the unit is
turned on/off.
≥Timer recordings begin when the set time is reached even when
playing.
≥Timer recordings do not begin while editing or copying in normal
speed mode (➡ 51).
≥If the unit is turned on when timer recording begins, it remains
turned on after recording finishes. It does not turn off automatically.
You can turn the unit off during timer recording.
≥If the unit is not put in the timer recording standby mode at the last
10 minutes before the programmed timer recording starting time,
the “F” flashes on the unit’s display.
≥When you programme successive timer recordings to start
immediately one after the other, the unit cannot record the part at
the beginning of the later programmes.
≥(If the GUIDE Plus+ system is set)
The GUIDE Plus+ data is downloaded at 2:50 AM every day. It
takes approximately 2 hours to complete data download. If you
want to make timer recordings during this time, set “Night
Download” in the GUIDE Plus+ system setup menu to “Off” (➡ 21).
≥If the actual broadcasting times of timer recordings overlap
[regardless of whether they are VPS/PDC (➡ 32) controlled], the
recording that starts first always has priority, and the recording of
the later programme will start only after the first timer recording has
finished.
≥Even when the unit is turned off, you can display the timer
recording list by pressing [PROG/CHECK].
Press [PROG/CHECK].
∫ To change a programme
Press [3, 4] to select the programme and press [ENTER].
(➡ 30, right column, step 3)
∫ To delete a programme
Press [3, 4] to select the programme and press [¢].
You can also delete a programme with the following steps
1 Press [3, 4] to select the programme and press [SUB MENU].
2 Press [3, 4] to select “Delete” and press [ENTER].
∫ To exit the timer recording list
Press [PROG/CHECK].
Programmes that failed to record are deleted from the timer
recording list at 4 a.m. two days later.
To cancel recording when recording
has already begun
To release the unit from recording
standby
Notes on timer recording
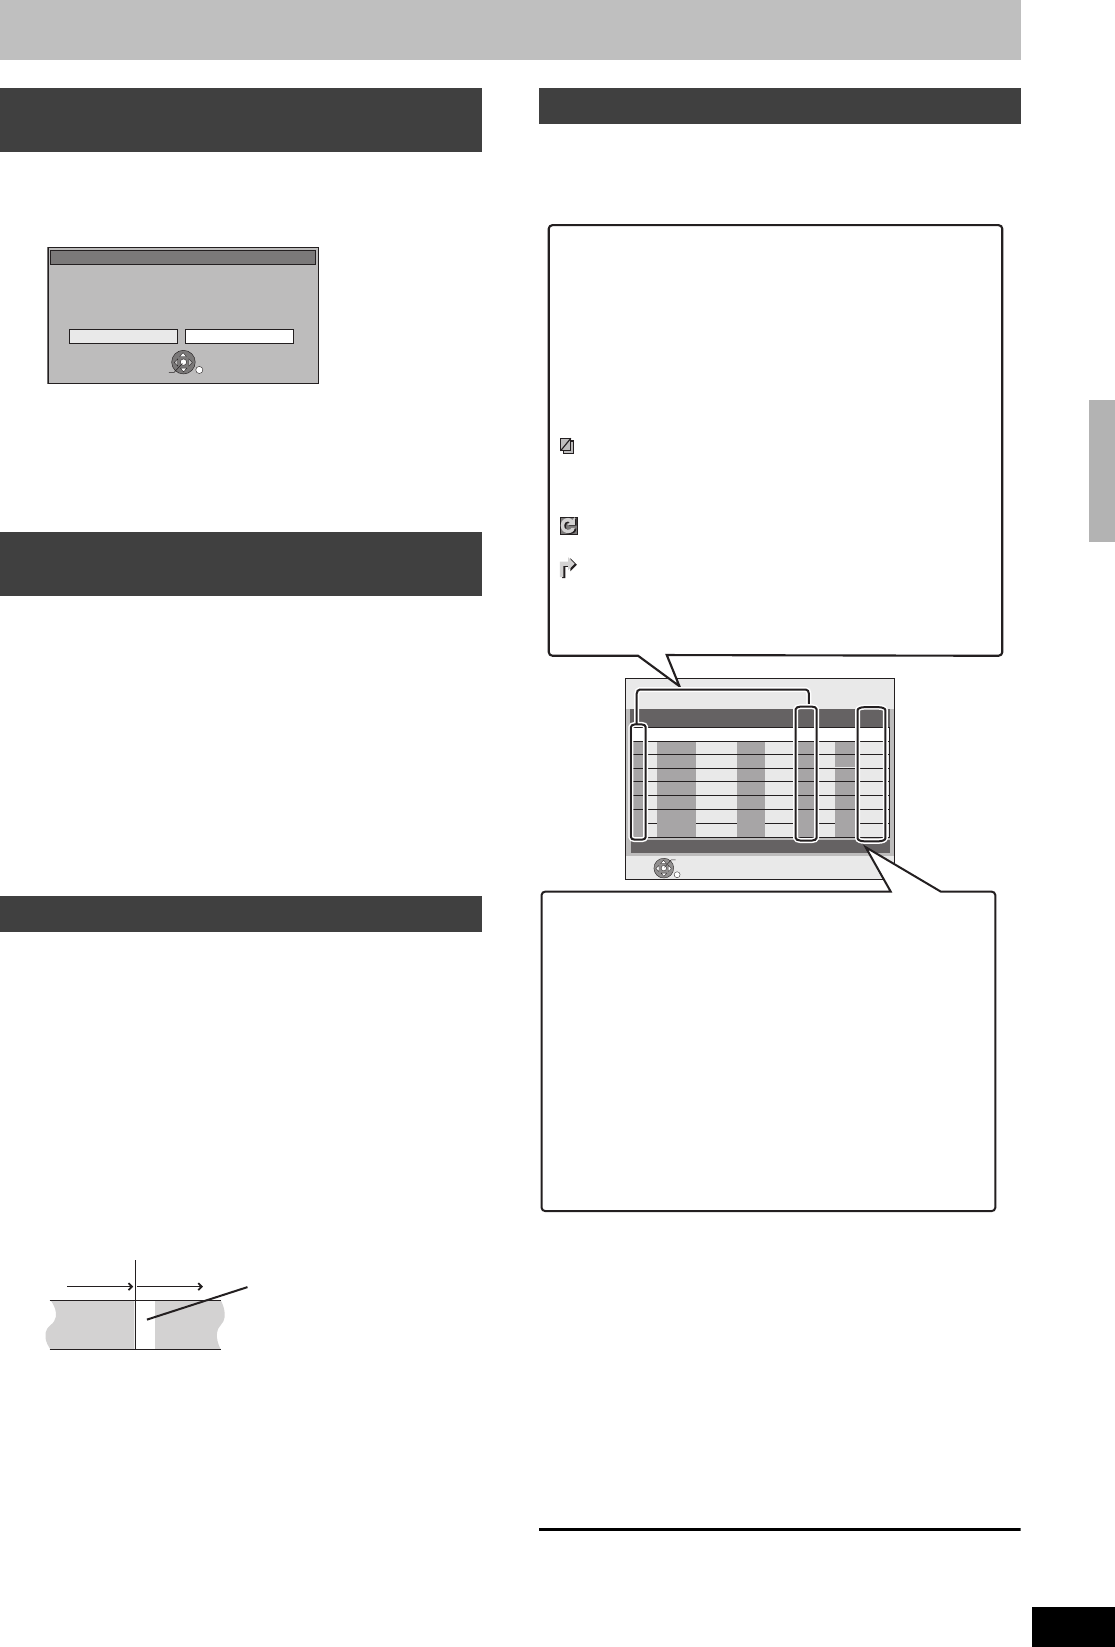
Stop Recording
Stop Recording
Cancel
Timer recording in progress.
Stop this timer recording?
It will be cancelled if you stop.
ENTER
RETURN
SELECT
Programme
Programme
Recorded Recorded
Not recorded
Check, change or delete a programme
Timer
Recording
1:58 SP
DVD
30:24 SP
HDDRemain
12:56:00 15. 7. TUE
RETURN
ENTER
Press ENTER to store new programme.
Mode
StopStart
No.
Date
VPS
PDC
HDD
DVD
Name
Drive
space
New Timer Programme
Icons
F Timer recording standby is activated.
[ This programme is currently recording.
W The times overlap those in another programme.
Recording of the programme with the later start time
starts when the earlier programme finishes recording.
You stopped a weekly or daily timer recording. The icon
disappears the next time the timer programme starts
recording.
F The disc was full so the programme failed to record.
The material was copy-protected so it was not
recorded.
X The programme did not complete recording because
the disc is dirty or some other reason.
Timer programmes set to Auto Renewal Recording
(➡ 32).
Titles that have been rerouted to the HDD
(Displayed while recording.)
HDD Recording drive is set to HDD
DVD Recording drive is set to DVD
Message displayed in the “Drive space” line
OK: Displayed if the recording can fit in the
remaining space.
> (Date): For recordings made daily or weekly, the display
will show until when recordings can be made (up
to a maximum of one month from the present
time) based on the time remaining on the disc.
! : It may not be possible to record because:
≥there is not enough space left
≥the number of possible titles has reached its
maximum.
Relief: Timer programmes that will be relief recorded to
the HDD.
Timer recording
EH65.book Page 31 Thursday, March 23, 2006 5:18 PM